The tutorial has been updated to work with ARCore version 1.12.0 so now we’re able to determine whether the image is currently being tracked by the camera to pause/resume the video accordingly.
I’ve been fascinated by augmented reality for quite some time. With both Google and Apple investing in ARCore and ARKit respectively, it’s never been a better moment to jump onto mobile AR wagon and start tinkering your very own augmented experience.
In the following series, I will cover the combination of ARCore and Sceneform. More specifically, I’ll show you how to play a video, using the Sceneform, on top of an image that can be detected with the help of ARCore Augmented Images capabilities.
.gif)
- In this post, we will go through the general implementation of the above idea.
- In part two, we will support video rotation and three different scale types, such as [.c]fitXY[.c], [.c]centerInside[.c] and [.c]centerCrop[.c] (without hiding excess image area)— all equivalent to ImageView.ScaleType.
- In the third and final part, we’ll add a finishing touch with the video fade-in effect and support hiding excess image area when using [.c]centerCrop[.c] scale type.
Without further ado, let’s get started.
First of all, I assume that you have proper Android development knowledge; hence I mostly cover AR specific things. Moreover, you are welcome to pull the code from this Github repository. All further steps can be found in according branches (i.e. everything described below belongs to step_1/simple_video_playback branch).
Our starting point resembles Sceneform Augmented Images sample but with several notable changes:
- It’s written in Kotlin. Nuff said.
- [.c]ArVideoFragment[.c] contains all AR-related code for simplicity's sake. Decomposition is up to you and your business needs. It also extends Sceneform [.c]ArFragment[.c] thus inheriting most of the boilerplate code that handles Camera permission, ARCore availability checks, etc.
- [.c]AugmentedImageDatabase[.c] instance is created and the sample images are added in the runtime so it’s easy to swap the sample image with your own; however, you can generate a database with the arcoreimg tool to save on performance.
- Each sample image has a corresponding sample video. Overall I prepared three image-video pairs to demonstrate all common edge-cases.
If you launch the initial commit code on a device that supports ARCore (or AVD with the Virtual Scene camera… if you’re brave enough) and point the device camera to a sample image, you should see a bunch of logs in logcat indicating augmented image tracking state. Official documentation might give you more details on how Augmented Images works if you’re not familiar with the topic.
Now that the app is able to detect sample images, it’s time to d̶o̶ ̶a̶ ̶b̶a̶r̶r̶e̶l̶ ̶r̶o̶l̶l̶ attach a video surface on top of that image. One needs multiple things to be able to render a video with the Sceneform:
- 3D model source asset file ([.c]*.obj[.c]) — represents a surface (in our case, it’s just a simple plane)
- Material definitions file ([.c]*.mat[.c]) — defines the visual appearance of a surface
- Sceneform Asset Definition file ([.c]*.sfa[.c]) and Sceneform Binary asset ([.c]*.sfb[.c]) — references the models and textures in your source asset, and also defines materials by providing material parameters for Sceneform’s physically-based materials.
- Some Kotlin code — to rule them all
3D model
For our task, we want to render a video on a simple plane. One can look at the Sceneform Chromakey video sample repository to find chromakey_video.obj file ready for use. Well, almost ready. In that example, a video is attached perpendicular to the plane, so it looks like the character stands straight on the floor. However, in our case, a video should lay on top of the plane (i.e. augmented image).
There are two ways to solve this issue, either modify the 3D model asset so it is positioned the way we want by default or add some code that rotates the plane whenever we attach it to the augmented image anchor. I prefer the former one — less code means fewer bugs.
I’ve used Blender to modify the 3D model — the difference is easy to notice in the image below.

A little segue into the folder structure — most of the Sceneform related files will be stored inside the [.c]sampledata[.c] folder.
To create the folder, right-click on the app folder in the Project window, then select New > Sample Data Directory. Note that you need Sceneform plugin installed to see this option.
The [.c]sampledata[.c] folder is part of your Android Studio project, but its contents will not be included in your APK.
— ARCore doc.
Now, either grab the ready-to-use 3D model file from here or produce your own. Give this file the name [.c]augmented_video_model.obj[.c] and put it inside the [.c]sampledata[.c] folder.
Material definition
A material definition is a text file that describes all the information required by a material. A minimum viable material definition must contain a material block and a fragment block.
— ARCore doc.
The first step is to create a new file with the ([.c]*.mat[.c]) extension inside the [.c]sampledata[.c] folder (e.g. [.c]augmented_video_material.mat[.c]).
Let’s define the [.c]material[.c] block that contains a list of property pairs that describes all non-shader data.
Parameters can be set at runtime using Sceneform’s material API and then accessed from the shaders. For now, we need just one parameter with the type [.c]samplerExternal[.c] — it will be used to pass [.c]ExternalTexture[.c] data (i.e. video stream) to the shader.
Next, we need to specify the vertex attributes required by the material. In our case, only uv0 should be specified, so it is possible to do texture mapping.
Shading model is set to unlit — it’s a perfect choice for rendering a video.
The unlit material model can be used to turn off all lighting computations. Its primary purpose is to render pre-lit elements such as a cubemap, external content (such as a video or camera stream), user interfaces, visualization/debugging etc.
— ARCore doc.
Blending is set to opaque — for now, an augmented video will have neither chromakey logic nor general transparency.
Next step is to define the fragment block that must contain valid ESSL 3.0 code.
The fragment block must be used to control the fragment shading stage of the material. You are free to create multiple functions inside the vertex block but you must declare the material() function. This function will be invoked automatically at runtime by the shading system and gives you the ability to read and modify material properties. The goal of the material() function is to compute the material properties specific to the selected shading model.
— ARCore doc.
In our case, the code inside the fragment block gets color information from the video texture using UV coordinates and then sets it as the color of the material — basically, lays out the video texture on a plane, pixel by pixel.
Sceneform assets
Now that we have both the 3D model and its material definition, it’s time to generate (*.sfa) and (*.sfb) files, with the help of the Sceneform plugin.
To begin the import process, right-click on the 3D model source asset file (i.e. augmented_video_model.obj) and select Import Sceneform Asset option.
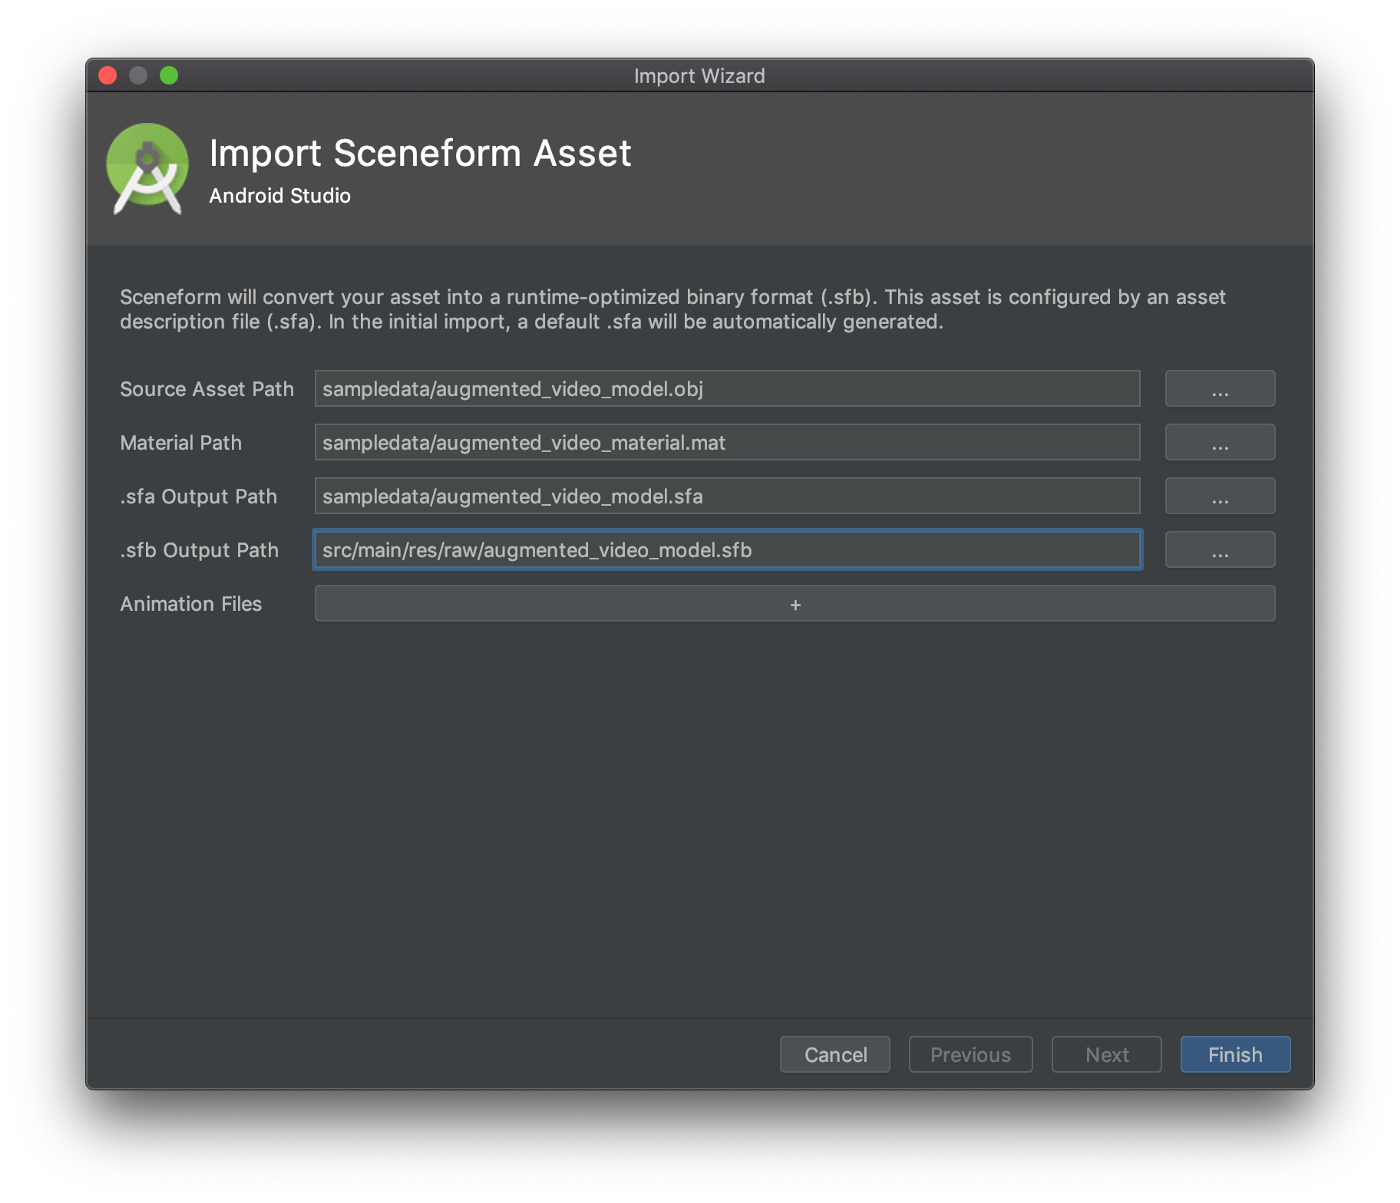
Both Source Asset Path and .sfa Output Path are already set for us.
Material Path is set to default which tells Sceneform to use the built-in default material but we want to set the path to our own augmented_video_material.matfile.
.sfb Output Path is set to the src/main/assets/ folder by default. However, if the filename (without file extension) is a valid resource identifier (e.g. R.raw.filename), then you can instead use the src/main/res/raw/ folder. I chose the second option, just because it’s a bit easier to refer to the (*.sfb) file later in the code.
After you click the Finish button, the Sceneform plugin will grind some bytes and produce both augmented_video_model.sfa and augmented_video_model.sfb files.
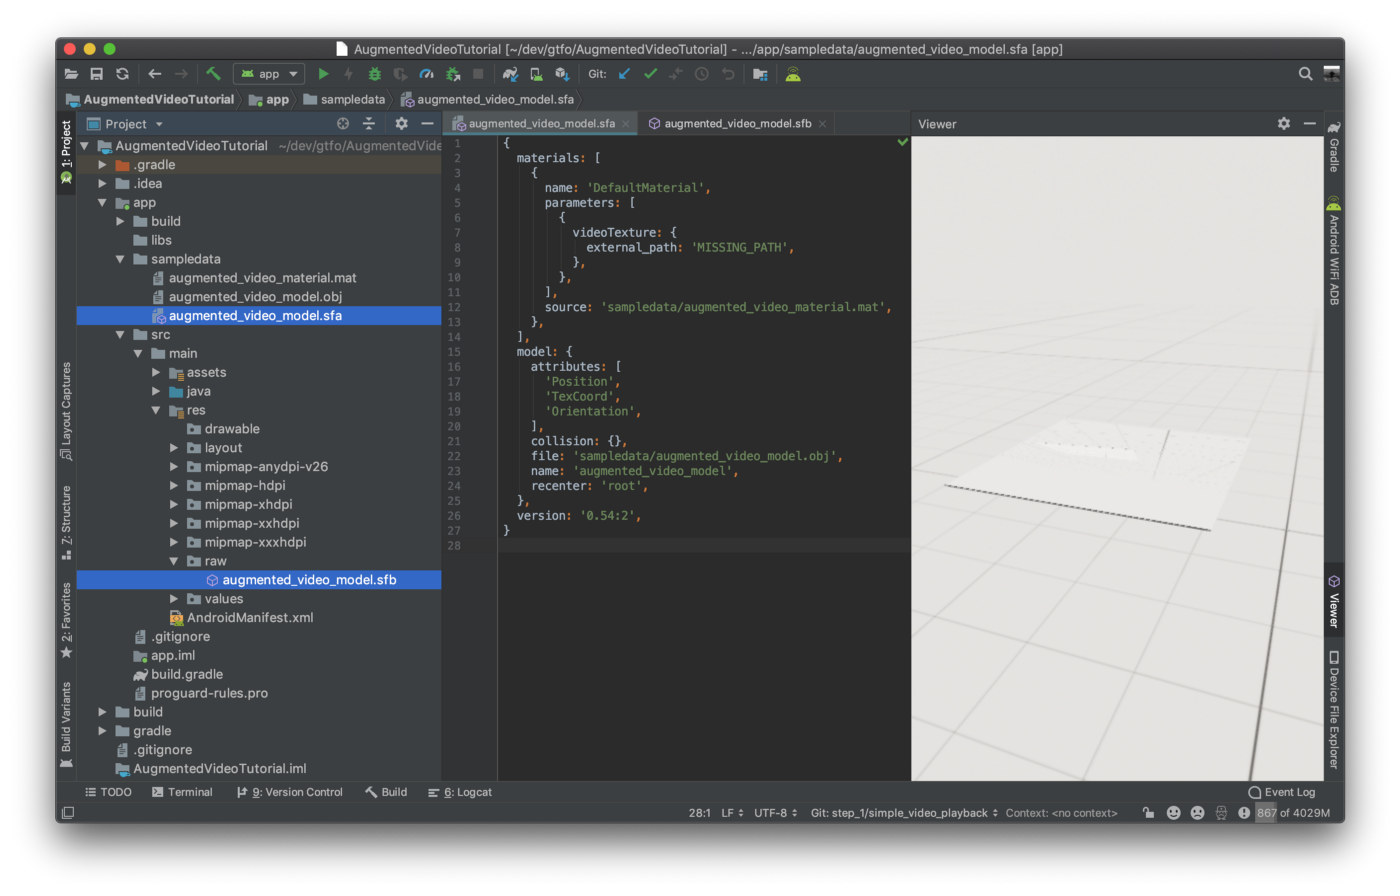
Moreover, it will automatically add these lines of code to the app level grade file:
With all the above things set up, we’re ready to use Sceneform API. Splendid!
While ARCore gives us information about the position, rotation, and size of objects in the real world, Sceneform lets us easily render 3D scenes. For the current use-case, ARCore will tell us where the image is and what are the dimensions; Sceneform will place and render texture, overlapping the image, that will consume a video stream provided by MediaPlayer. The implementation does not take many lines of code and is quite straightforward — let me walk you through the main steps.
The first thing we need is an instance of ExternalTexture, which contains SurfaceTexture and Surface that can be displayed by Sceneform. Next, we call mediaPlayer.setSurface(externalTexture.surface) to instruct the MediaPlayer instance to use above ExternalTexture surface as the sink for the video portion of the media.
I’ve deliberately used the simplest possible MediaPlayer setup to focus more on the AR aspect of the app. However, one can and should handle things like playback lifecycle, error handling, and audio focus. It is also possible to replace MediaPlayer with ExoPlayer if it better meets your business needs.
The second thing we need is to create a ModelRenderable instance. This is actually the thing that renders 3D model (video surface in our case) when attached to a Node instance.
The source is the augmented_video_model.sfb Sceneform binary asset, which was generated during the previous steps. Inside the thenAccept { renderable -> ... } block, the resulting instance is assigned to the class property, so it can be used later. Both isShadowCaster and isShadowReceiver fields are set to false in order to disable redundant (in our case) costly shadow computation. Another crucial thing is to assign the ExternalTexture instance to the renderable material — the key is videoTexture the same as the name of the material parameter of type samplerExternal. ExternalTexture acts as a bridge between the MediaPlayer video output and renderable material input.
Lastly, AnchorNode instance is created and it’s parent set to AR scene (the root of 3D scene hierarchy).
All right, it’s time to connect all the dots! First of all, let’s see how we consume AR scene data.
On every frame onUpdate method is called.
After we make sure that current arFrame is not null it’s safe to retrieve all the tracked augmented images. We want to support the playback of one video at a time. Therefore, if ARCore loses the current active image FULL_TRACKING state we will pause the video. If the same image gets FULL_TRACKING state back, the video will resume. If a new image will become active, then the corresponding video playback will start from scratch.
Talking about video playback — here is the juicy part.
It turned out handy that every augmented image that was saved to ARCore augmentedImageDatabase has the name that is equal to a corresponding video file stored inside the assets folder. The first block of code opens proper AssetFileDescriptor and feeds it to the MediaPlayer instance. Right after that, we tell the MediaPlayer instance to prepare and start the video playback.
The second block of code attaches the video Node to the augmented image centerPose making sure, that the Node will stay aligned with the augmented image no matter how users move their mobile devices. Remember that little modification to the 3D model of a plane? Thanks to it we don’t need to either move or rotate the Node — it’s perfectly aligned by default. In order to fully overlap the image — we set the Node instance localScale property equal to the size of the augmented image. The scale trick works only because our 3D plane model is 1-by-1 meter in size.
Lastly, the third block of code sets OnFrameAvailableListener to the ExternalTexture instance. What happens next is that after the first video frame becomes available (i.e. MediaPlayer manages to deliver a first glance at the video) we assign the Node instance renderable property — hence it appears inside the AR scene for the first time. If you immediately assign Node renderable property, you will see a solid black texture during the preparation of the MediaPlayer which isn’t a good user experience.
Finally, let’s build and install the app on a compatible device and see what will happen. Don’t forget — the full source code is also available on GitHub.
Warning! Vertical video on Vimeo ahead ¯\_(ツ)_/¯
Oh well, I can definitely see the videos, and they indeed overlap the images.
However, one can notice that video proportions are all wrong. This is because the size of an image is not equal to the size of the corresponding video. And we didn’t write any code to compensate for that, yet.
Also, what’s with the last video rotation? Well, some video files contain metadata, such as rotation and unfortunately, MediaPlayer doesn’t apply it automatically — that’s another thing for us to support.
Not a big deal folks, trust me, we’ve just finished the boring part. In the next post (more laconic, fingers crossed), we’ll introduce multiple different scale types along with video rotation support. Stay tuned!